
[ad_1]
Price Action Support and Resistance
As we’ve seen throughout the education section, there are many ways to find support and resistance levels. Fibonacci is a popular tool, and the psychological level is an important point of interest. But if the market doesn’t recognize support or resistance, what’s the point? None of them, are they? The only usefulness of support and resistance is to be able to highlight what is likely to happen while allowing a trader to adopt an objective framework for his or her own activity in the market.
Price fluctuations can confirm support or resistance levels. Or – if there is a lot of reaction at a given price, they can set the level themselves. If you watch AUDUSD at the 0.8000 level and see the price bounce back to that level and then find sellers, then you know that 0.8000 is not only a possible resistance level as it is psychological – but traders and market participants are This opinion, and expressed this opinion with their capital. When prices drop, more sellers can join the bandwagon, while buyers, on the other hand, become less optimistic as prices drop, allowing further declines.
However, the 0.8000 level will not act as resistance if market behavior does not change when it comes into play. When the bulls have the upper hand, it’s just a speed bump to higher prices.
We examine this concept in our article on price action wicks and highlight how reactions within candles can reveal a lot to traders. It can highlight important levels on long-term timeframes while removing some of the noise that is prevalent on short-term timeframes. But it’s the reaction shown by the wick that highlights the support and resistance levels that traders can use in their approach.
How to Find Support and Resistance via Price Action
While price action provides traders with a reasonably objective framework, identifying viable support and resistance areas requires some subjectivity.
The key is to find market areas or price levels where past behavior has changed, revealing the potential for future change. This is not to say that support levels will always hold or that resistance levels will always bring sellers into the picture – but it does highlight areas where traders can try to develop strategies.
The Touch and Go Long Wick
This is popular in fast markets. If allowed to show some form of surrender, it usually stands out in the form of a long wick. A wick naturally highlights a reversal within a candlestick, and when this is also accompanied by a tangle, it can be a strong indicator of short-term momentum. But for support and resistance purposes, only the top or bottom of the wick is needed.
In our AUD/USD example above, there is a long wick that highlights the reversal from the 0.8000 level. But even before that, there was another support level that highlighted the reversal from the 0.5500 level. While technical support failed to break above the 0.5500 level, the fact that buyers entered 9 pips early suggests that there is some defense at this price and buyers are ready to step in before that level comes into play. It also suggests that buyers are a little aggressive here, planning to buy even before extensive testing.
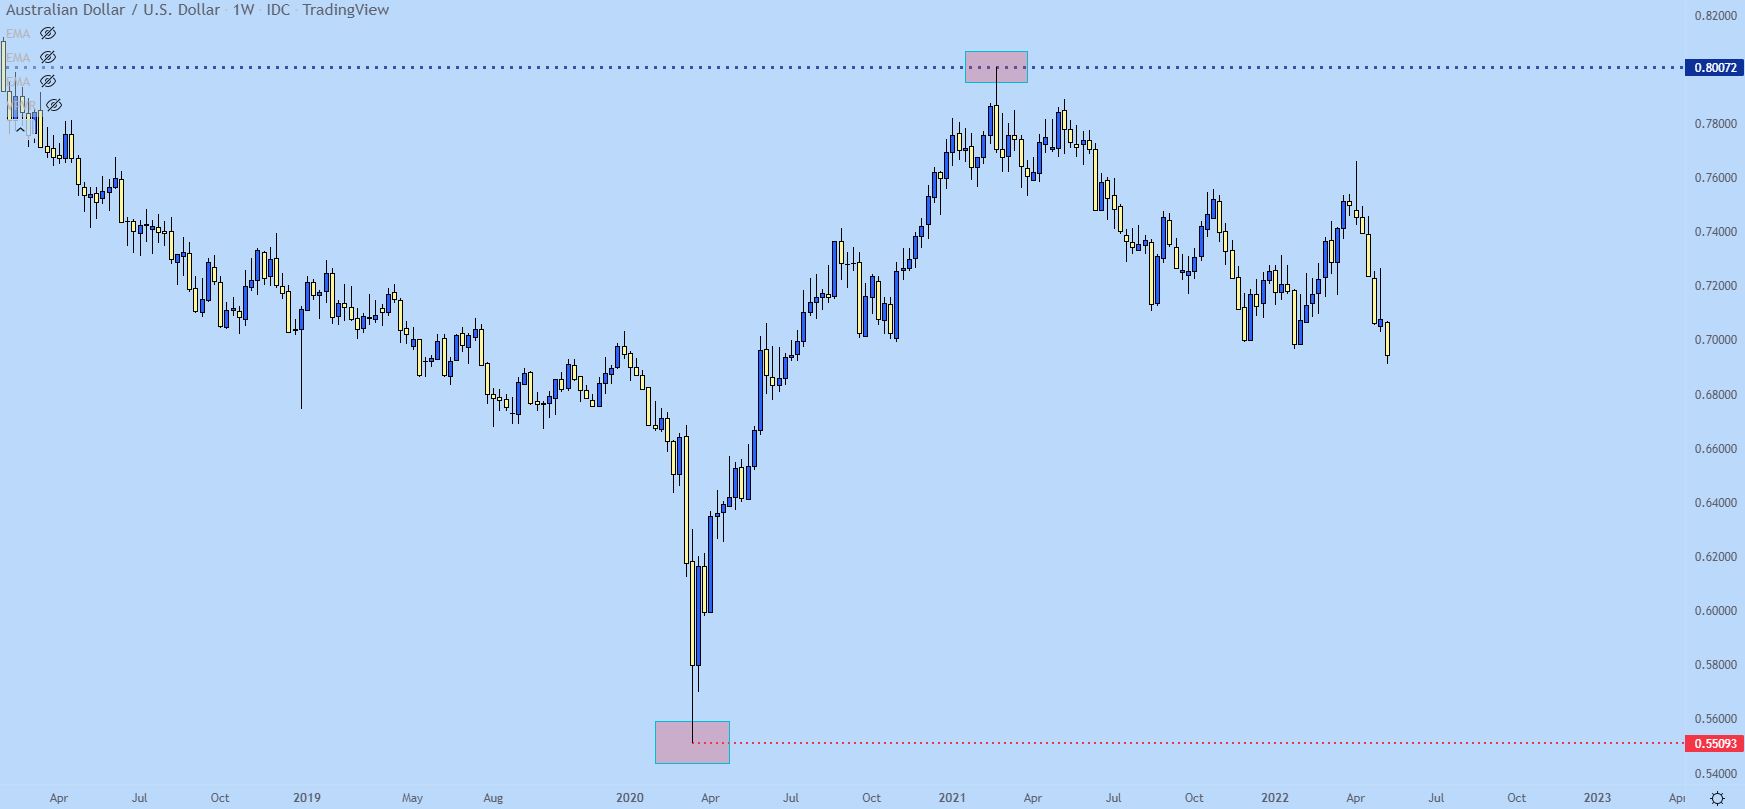
Chart created by James Stanley; AUD/USD weekly chart, April 2019 – April 2022
So the example above shows the two strong cases I’m referring to, but there’s another long wick on the graph that I haven’t addressed yet, and I don’t want this post to be just an example of selected things when they happen brilliantly. So let’s dig a little deeper…
On the left in the image above is a long wick highlighting the reaction, I added a purple box to that area in the image below.
AUD/USD weekly price chart
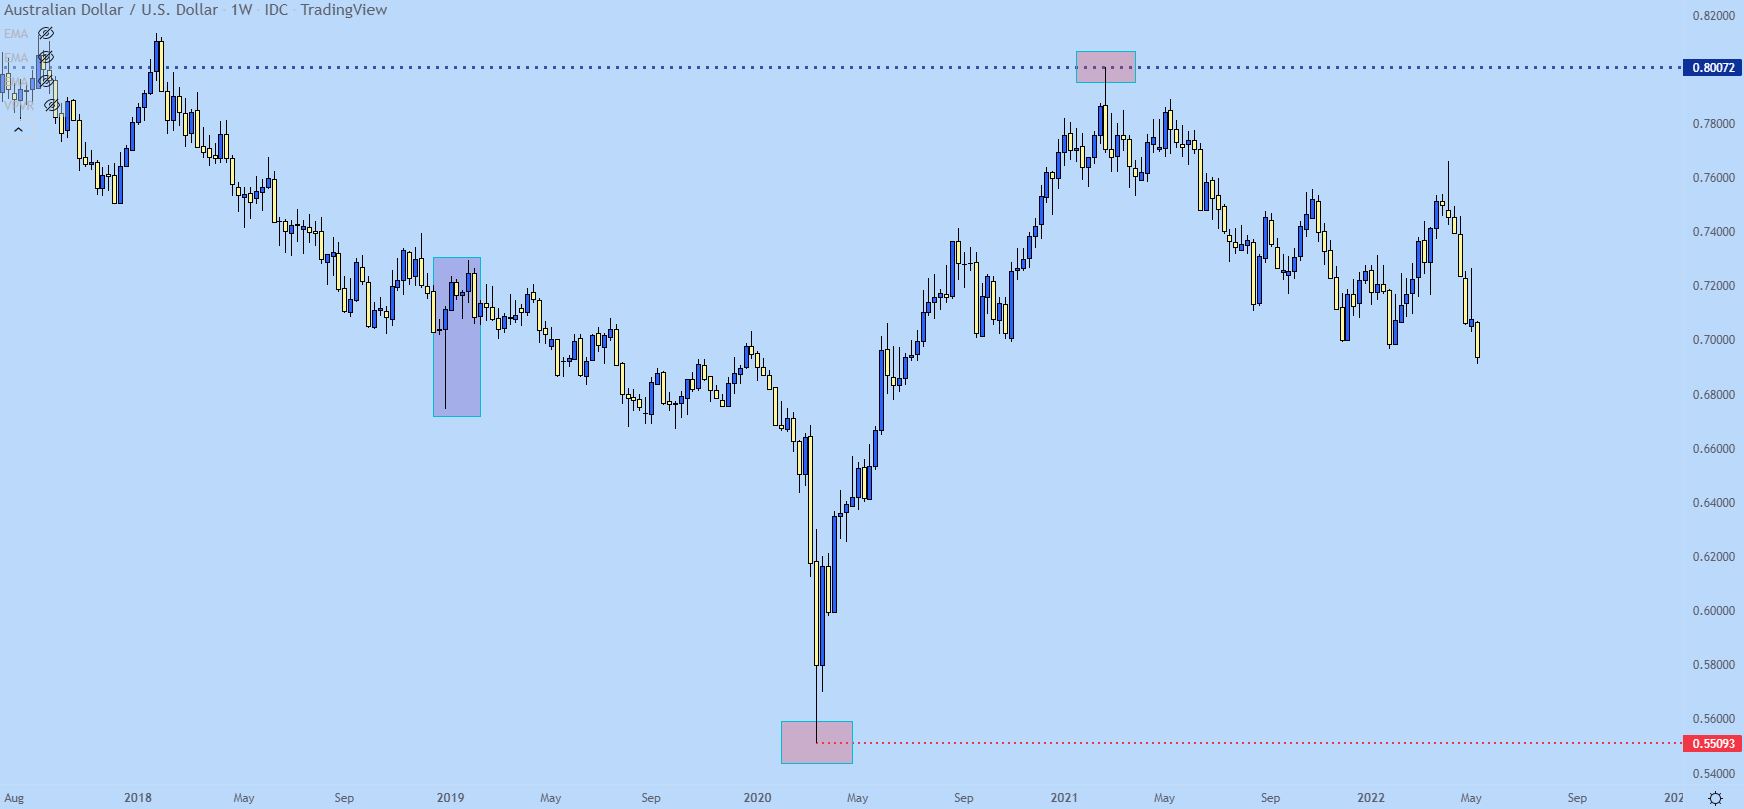
Chart created by James Stanley; AUD/USD weekly chart, Aug 2017 – Apr 2022
I elaborate on this element below, we basically see a wick bottom at 0.6743 followed by a strong reaction as the candle closes above the 0.7000 psychological level for the week.
So another way to look at this candle is that something bad happened this week, which prompted sellers to push the price below the main psychological level, eventually capitulating around 0.6750. This was followed by buyers who reacted to the sell-off, eventually erasing all bearish action and then some.
Recommended by James Stanley
The Basics of Breakout Trading
Sounds optimistic, right? Well, over the next few weeks, buyers kept pushing and eventually making new highs within the 0.7300 handle (0.7295 to be precise).
The price made a comeback later in the year for almost three months – helping set a low for the pair. When this support came into play, I added a dark red box around the area.
Weekly AUD/USD Price Chart (Oct 2016 – Jul 2021)
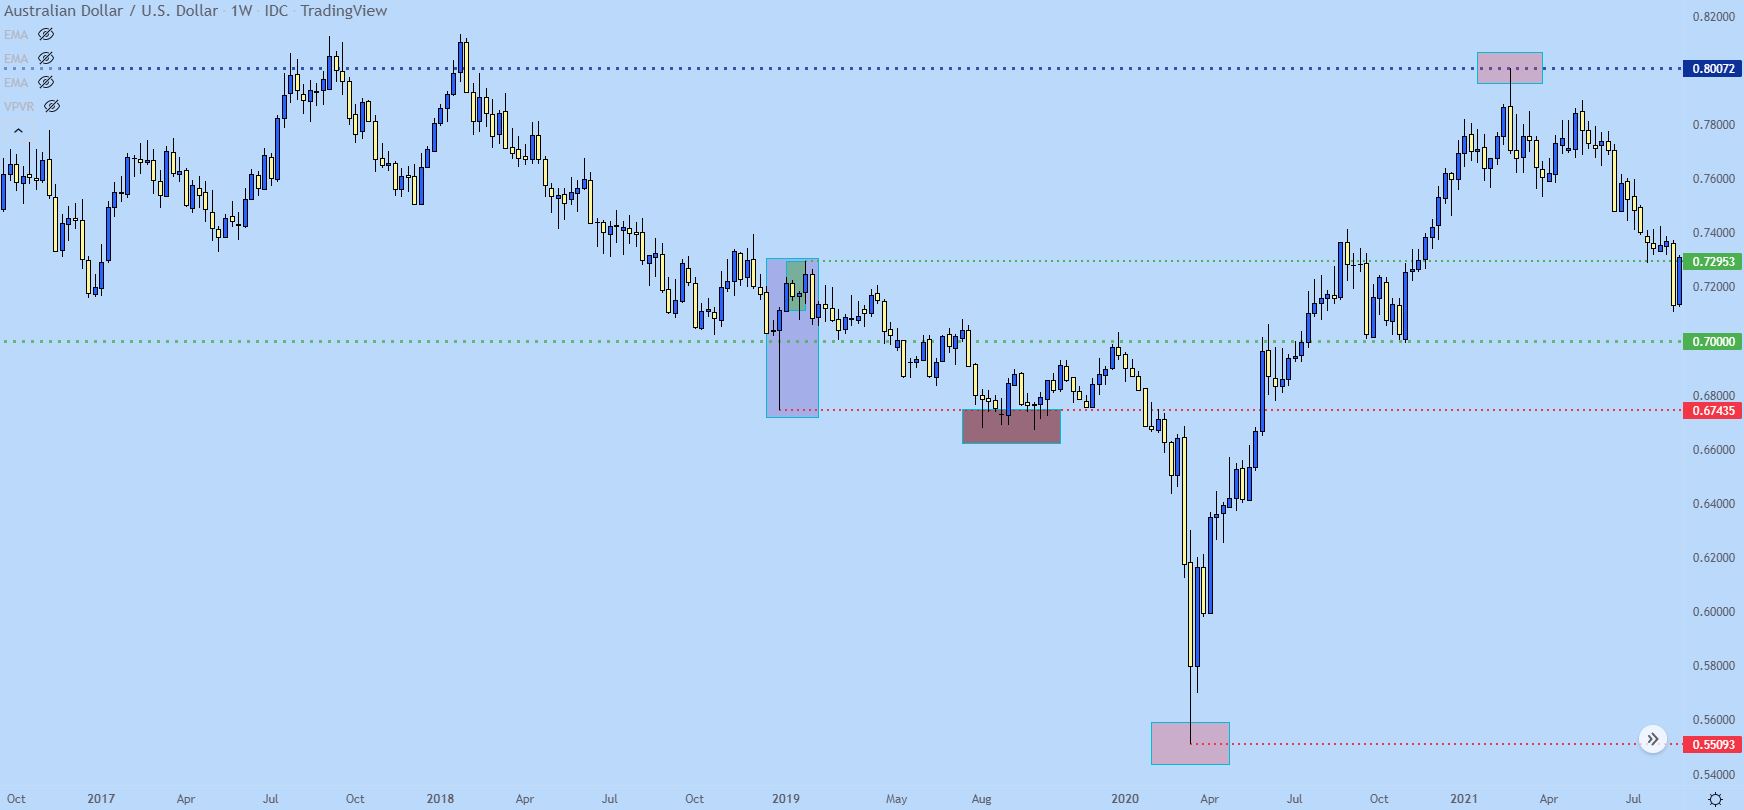
Chart created by James Stanley; AUD/USD weekly chart, Oct 2016 – Jul 2021
In the example above, the support created by the long core helped hold the low after it came into play in August 2019. And just to be on the safe side, this information can help traders find support as sellers push more and more, as seen in the lower highs between the initial test of 0.6743 and the recent Wicks rally lows in the same weekly line. where indicated.
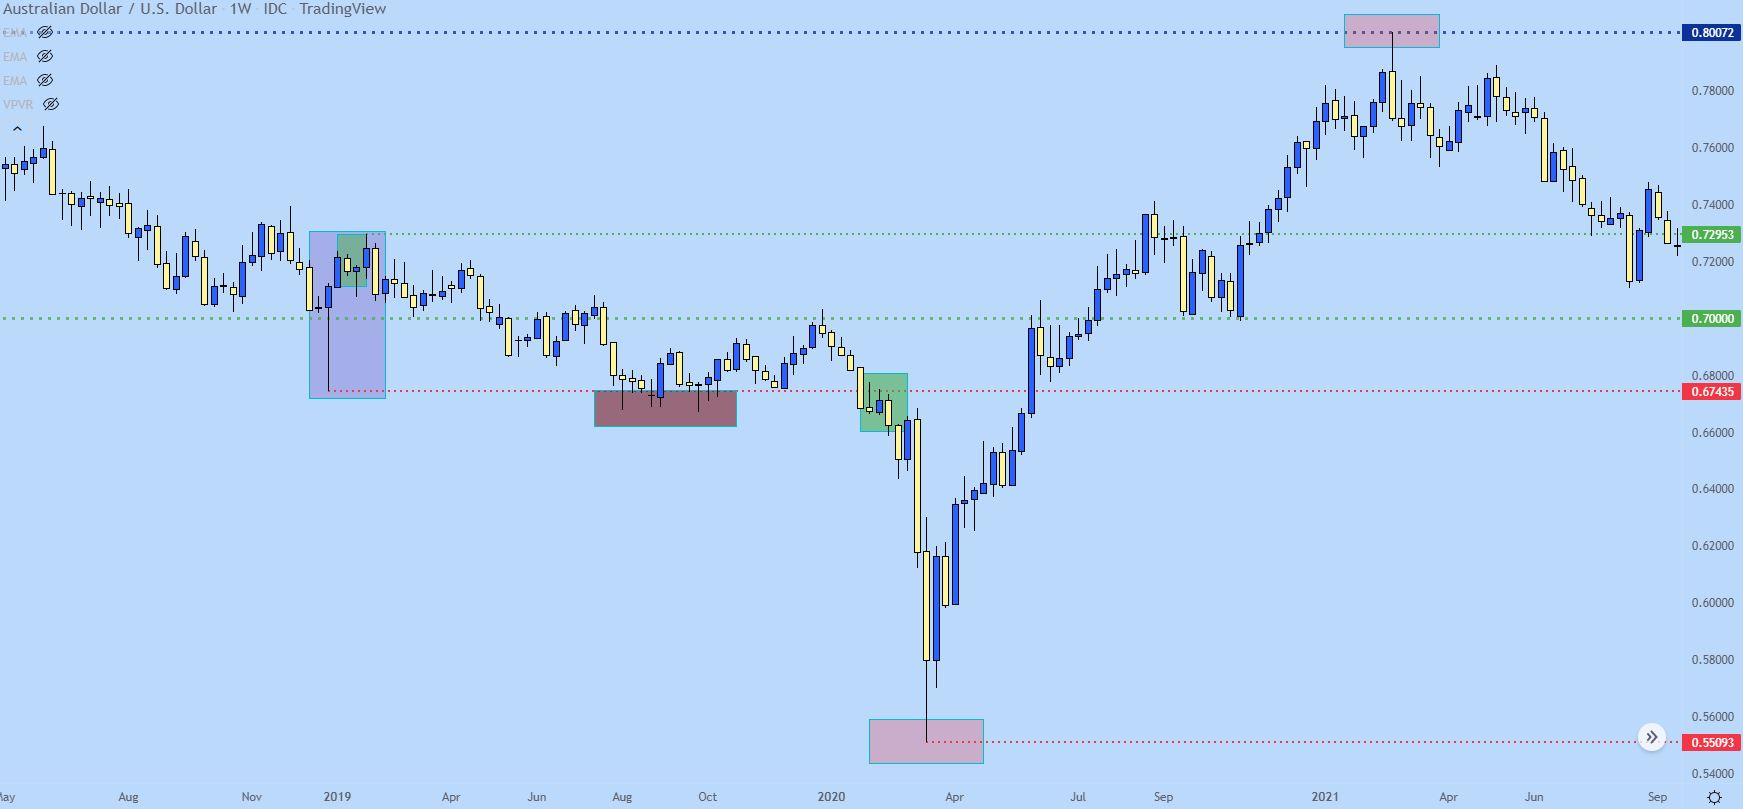
But more exciting setups outside the zone won’t come until February 2020. I added a green box around this area on the chart, and during this 3-week period, you can see where the price revolves around the resistance and previous support. This led to a breakdown of another new low, followed by a brutal swing above 1,000. The reason is because the timing of Covid has been priced in by the market.
But as you can see from the tech background, the groundwork for the collapse was laid, and Covid was ultimately the cause.
Focus on the green box in the image below and emphasize the importance of the previous long wick for setting a) support and b) resistance as the crash has taken hold.
AUD/USD weekly price chart
The Grouping or Collection of Wicks in Tight Proximity
It’s a bit subjective, but it’s especially important on long-term charts.
If you see multiple wicks reacting in the same environment, you have an inflection point. This is a very clear sign that there is a line that brings buyers or sellers into the market. Will this last? You never know, what you do know is that this is the price that puts the buyer/seller in the market and is useful to the trader in and of itself.
Now that we’ve talked a lot about AUD/USD, let’s focus our attention there.
After AUD/USD hit the 0.8000 mark in February 2021, buyers are preparing for a pause. Price action has retreated, with support near 0.7557, the same support level as before the 0.8000 test. I’ve added a green box around this area, but I’ve also added a red box, which represents a very slight penetration of this level on the weekly chart that has been hit by the inversion, like a wick through the bottom The same this candlestick shows.
Over the next six weeks, prices rallied more than 300 points from the lows as this support held, a simple reference point for swings earlier on the weekly chart.
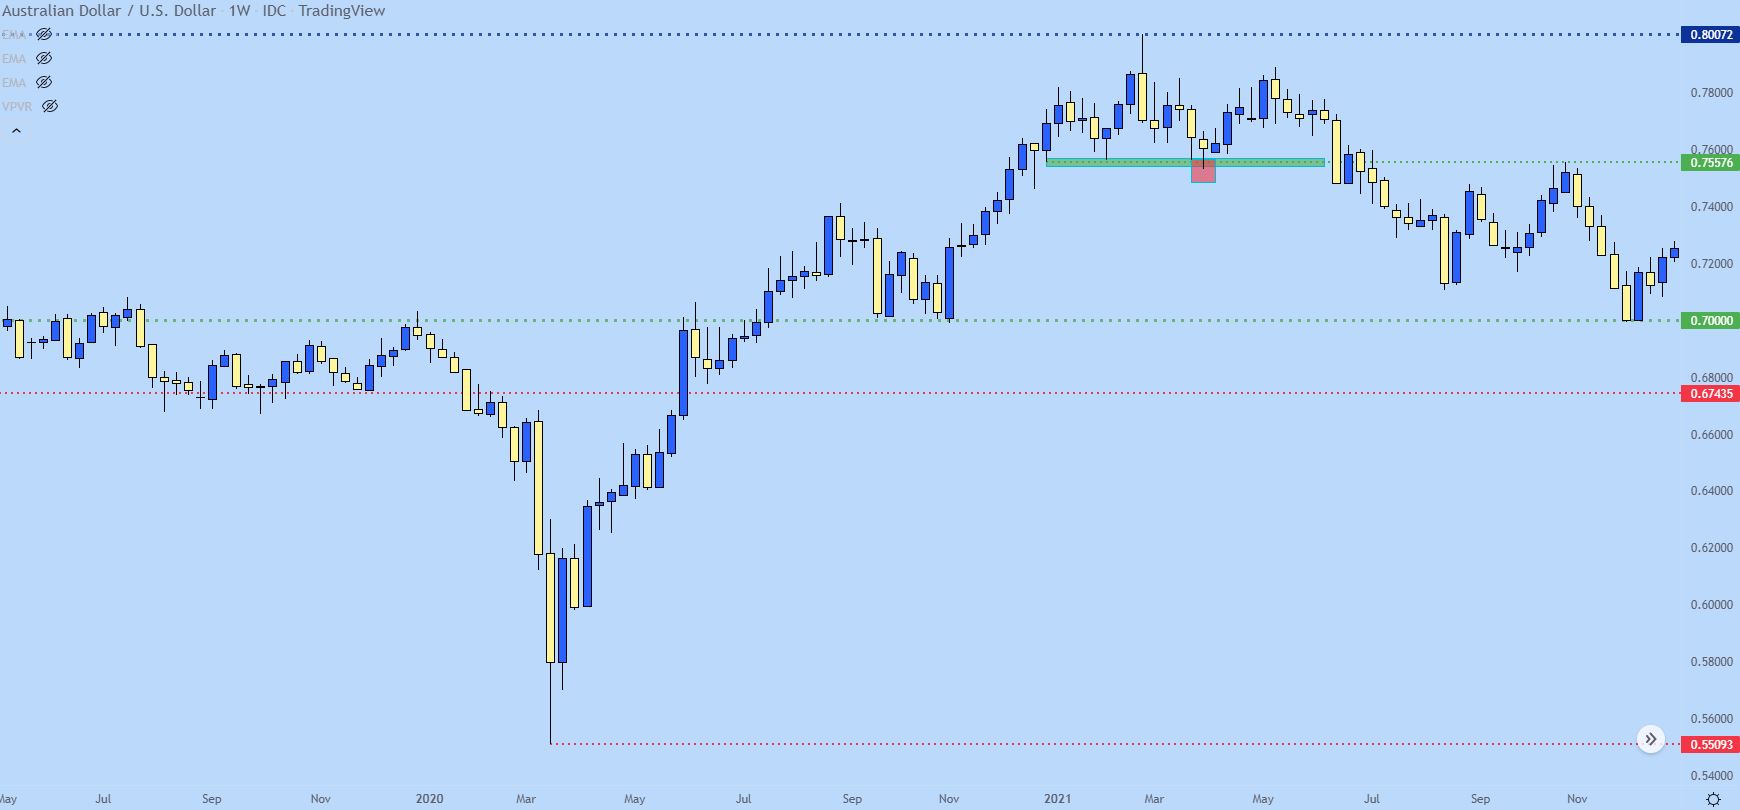
Chart created by James Stanley; AUD/USD weekly chart, May 2019 – April 2021
Taking a closer look below, I’ve added two purple boxes around the weekly low prior to the 0.8000 test, after which the price moved back to support (red).
AUD/USD weekly chart
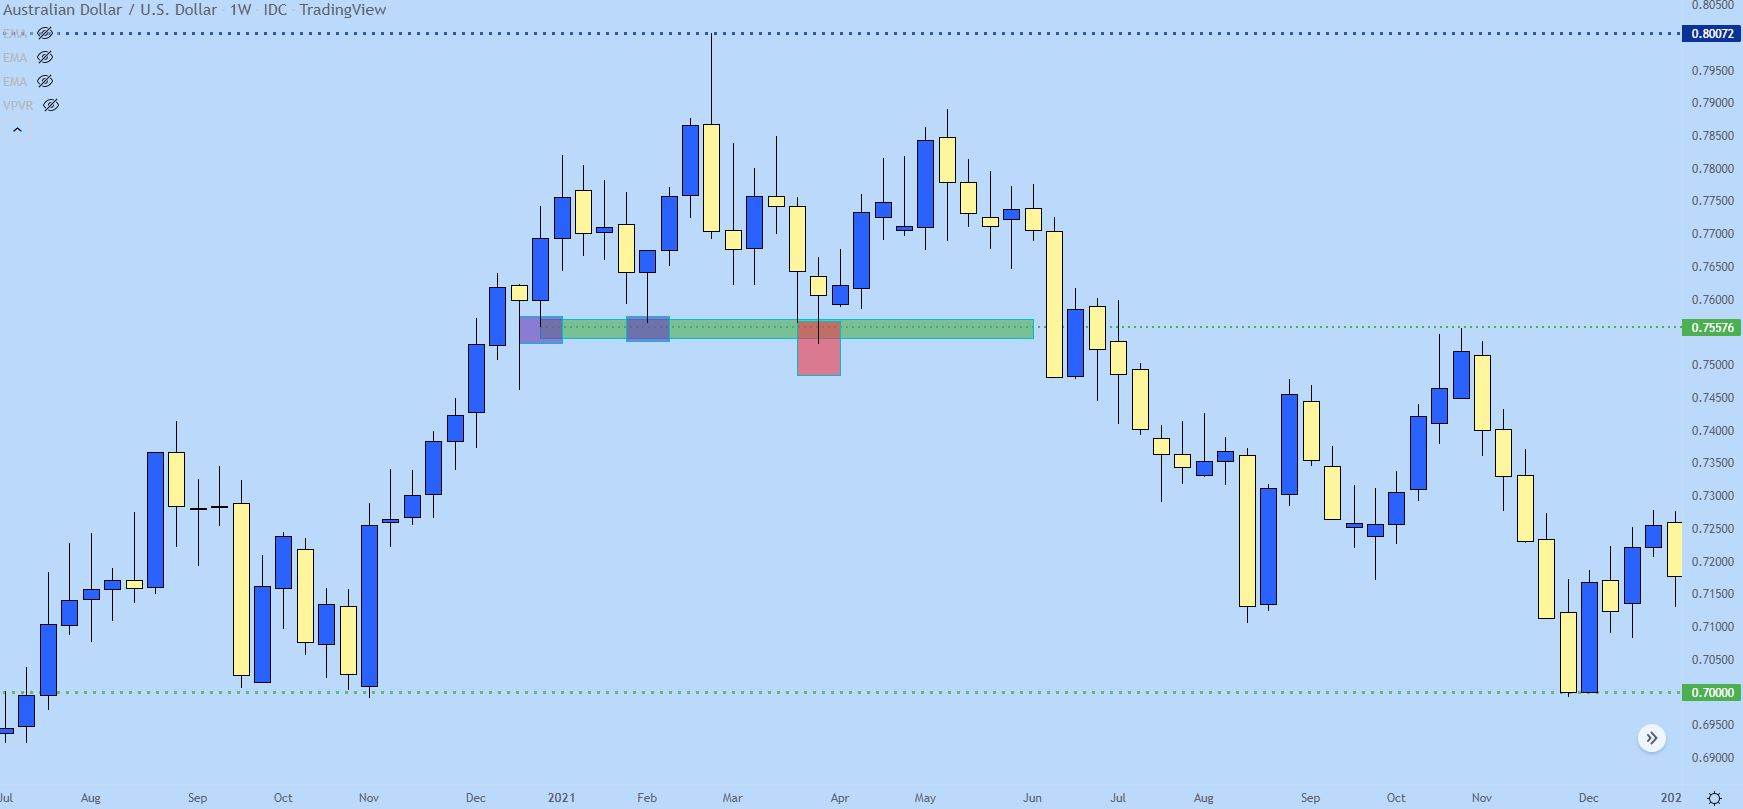
As you can see, after 0.8000 refused to help hold the lows, this support test saw the price rise and hold above that level for the next few months. But in June, the bears had had enough and the price quickly fell below this support area.
There are a few takeaways from this iteration: After the initial breakdown, price is still finding resistance at this level, as shown by the weekly wicks highlighted in purple in the chart below.
But, perhaps more importantly, the same price topped the list later this year, highlighted in orange. This bend in resistance led to a sharp decline in price to a low of 0.7000.
Weekly AUD/USD Price Chart
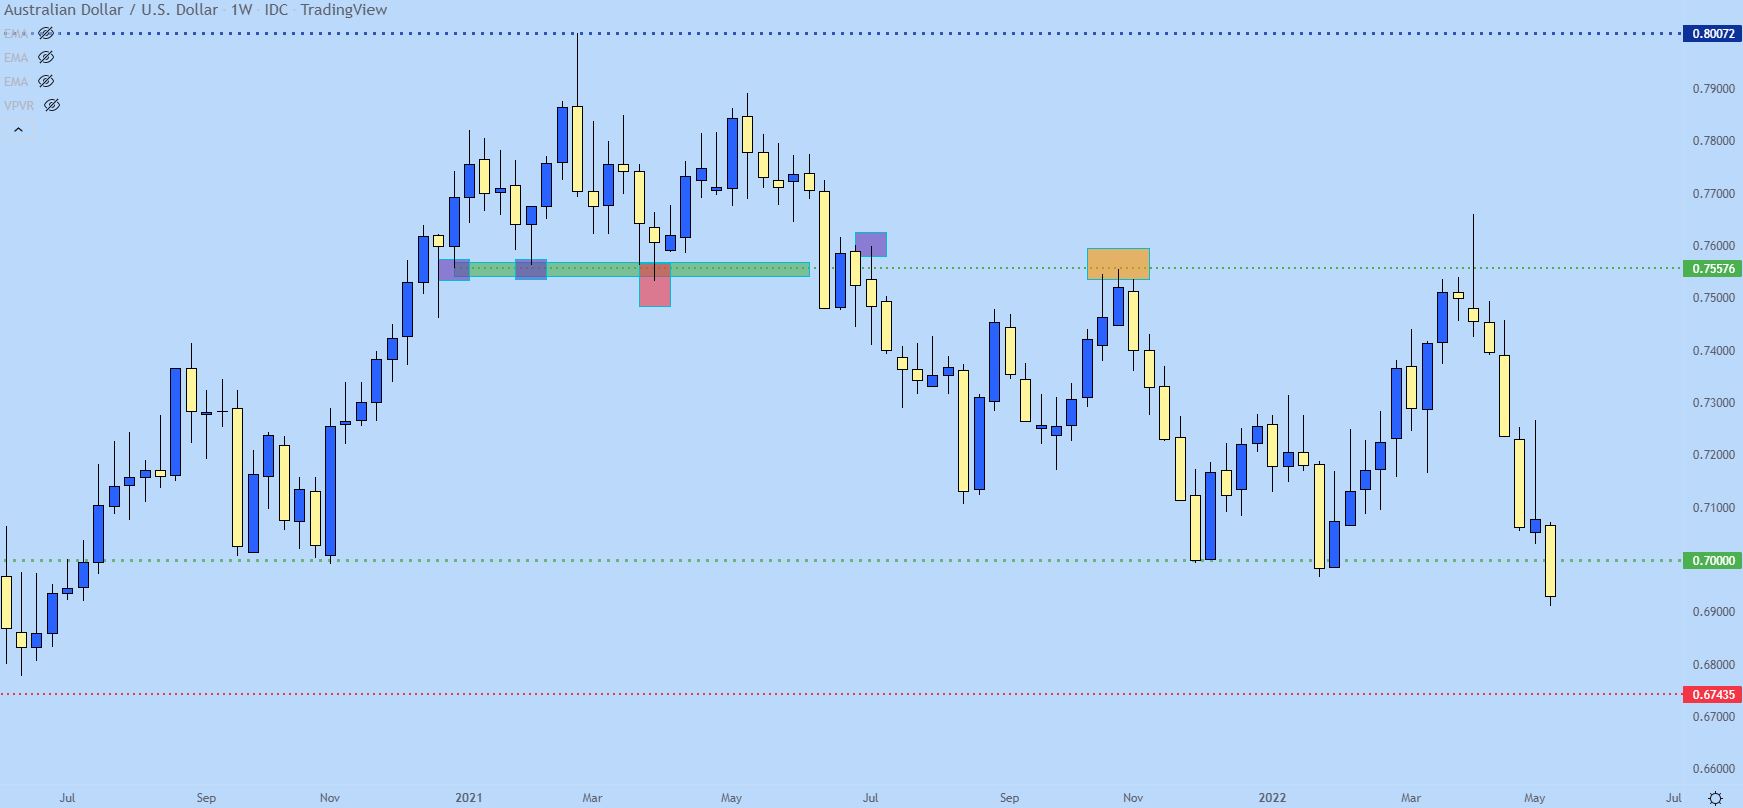
Chart created by James Stanley; AUD/USD weekly chart, July 2020 – May 2022
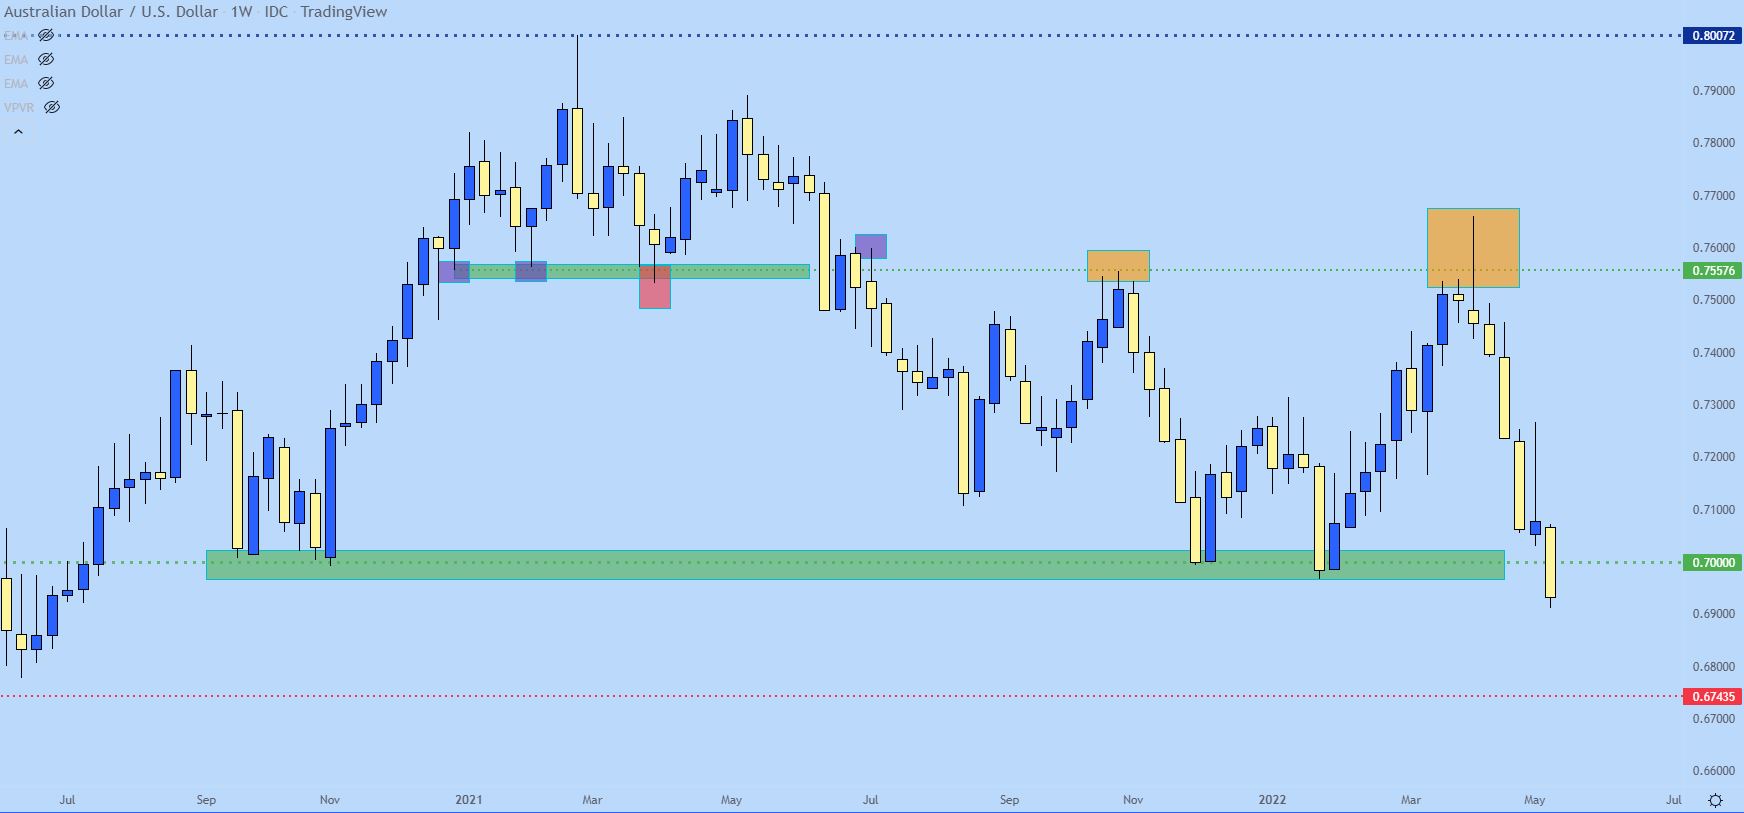
The large number of 0.7000 turned out to be important as it helped hold the lows after this downtrend and even got back into the equation a few months later. This shows a range of reactions in similar locations, and while this may not be in the form of long wicks, this proximity to support pricing allows traders to see this very clearly.
The corresponding bounce from this support met the same resistance level as the previous interception high – which was even accompanied by a long wick – indicating an aggressive intra-bar reversal. After that, the bears got back on track, eventually breaking the psychological 0.7000 mark.
But the entire structure of this setup is drawn from the weekly chart of AUD/USD, using only simple price action indicators.
AUD/USD weekly price chart
Another key point of support and resistance can be gleaned from price action, which we will address in our next article on the topic “Price Action Tells.”
[ad_2]